Search |
Tour
Hi, welcome to PacMe. This tour will give you a run through of the PacMe website. It will help you get comfortable with PacMe before you become a customer or serve as a handy reference guide once you get started using PacMe. For a briefer video tour, try the Tour de PacMe.
At PacMe, we provide our customers with a dedicated US mailing address for your online shopping purchases. We will store your incoming packages in our warehouse and then ship a consolidated outgoing package to your address overseas (or to your Aunt Sally in Chicago if she is coming to visit you).
We named our company “PacMe” because we believe that packing your items, not just consolidating your boxes, provides you the most value.
We open every package upon arrival and scan the invoice and take photographs of your items. You will see in your website account exactly what is on your shelf in the warehouse.
When you are ready to consolidate, we will carefully repack your items into a double-walled shipping box, using some of the incoming packaging for structure and organization. Repacking your items, not just your boxes, also helps avoid the dimensional weight surcharge. Pack and save. That’s the PacMe Way.
While we are expert packers, we are not actors, but you can hear it straight from the Founders in the video below. Or read more about PacMe on the About Us page.
There are only 2 types of PacMe plans: Package and Package+Mail. The vast majority of customers choose the standard Package plan. Both plans have the same services and fees associated with receiving, storing, consolidating, and shipping your packages.
Here are some tips when you sign up for a PacMe account.
Once you open an account at pacme.com (takes less than 5 minutes), you can immediately start using your PacMe address to receive your online purchases. You can choose your own mailbox number during signup. You don't have to wait. In order to consolidate and ship out your packages, however, your account needs to be verified. This is generally done by two different methods.
The first method is the easiest and least intrusive. You can link to us via Linkedin or Facebook. Or, at least send us your Linkedin URL if you don't want to connect. We just need some assurance that you are a real person and not a bad guy.
The second way is to upload ID documents.
Your My Account page is comprised of several tabs where you can manage your details and information. This is largely self-explanatory, but here are a few highlights:
You will probably spend most of your time on the My Packages page. It is Organization Centrale.
The My Packages section is primarily used to manage your Incoming Packages, whether they are just sitting on your shelf, at the Special Request station, or earmarked for a consolidation that still needs to be completed. Once a package is consolidated and shipped to you, it will be moved to the History page.
On the other hand, the My Consolidations page (discussed later) is primarily used to view each consolidation itself. For instance, you can view the packing and shipping options you have chosen for the Consolidation. You can still see all the Incoming Packages inside each consolidation, but the focus is on the Consolidation. Similar to an Incoming Package, a Consolidation has its own dedicated chat box, tabs for photographs and documents, and other options.
Let’s start with the My Packages page. It has 4 sections:
To view a specific Incoming Package, you can simply click on the Package ID (e.g. J0005), and you will be transported to the package’s page, comprised of several tabs. You’ll see a scan of the invoice that accompanied the package, several photos of the items, and the carrier information. There will be a blank Item List that, if filled out, will be used to create the Customs List of the consolidation into which this package will eventually go. Most importantly, you’ll see the dedicated chat box to discuss any questions or issues you might have about this package.
You can also view a brief tutorial about the My Packages tab below...
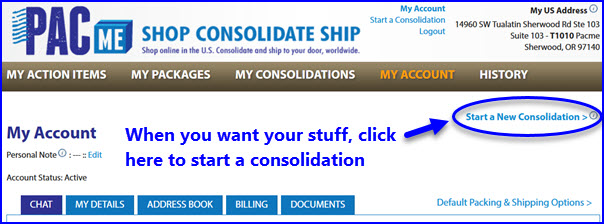
The My Packages section above showed a few consolidations that were already in progress. We necessarily got ahead of ourselves. How did we create the consolidations in the first place? That’s what we will explain here. When you want us to send your packages to you, click on “start a new consolidation” in the upper right corner of most pages when you are logged in, and we will walk you through the handful of steps to make that happen.
Step 1: Click on "Start a New Consolidation"
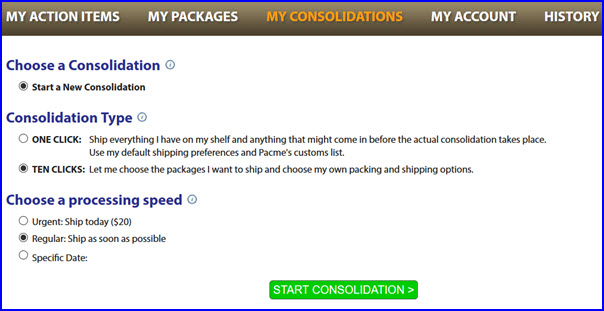
Step 2: Choose the processing speed (you will choose the shipping transit time later) We usually pack and ship "same day" except around the time of year that everyone needs it urgently!
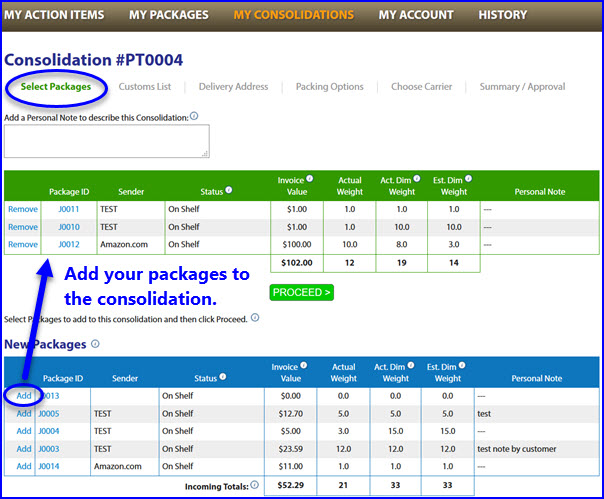
Step 3: Add your packages
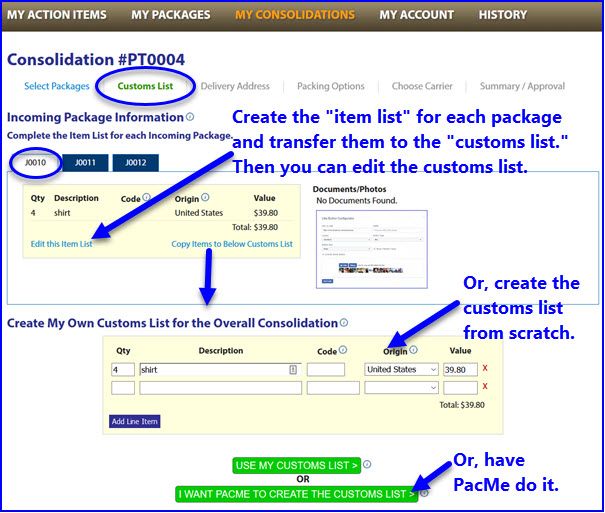
Step 4: Create the customs list Customs Lists are sometimes a bit tricky because different countries require different levels of detail. In general, personal packages under $2500 in value do not require “Harmonized Codes” when describing the contents of the package. You are responsible for all duties, taxes, and importation fees on your end. We will print the final customs form or electronically attach it to the shipment, but there are two ways to fill out the Customs List (the “Item List”):
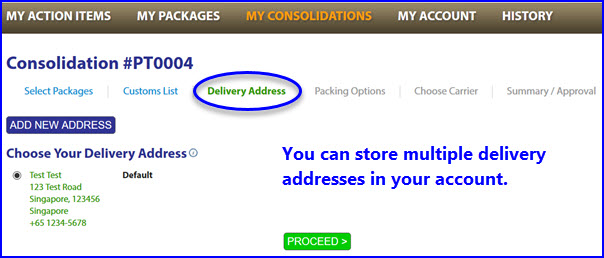
Step 5: Choose your delivery address
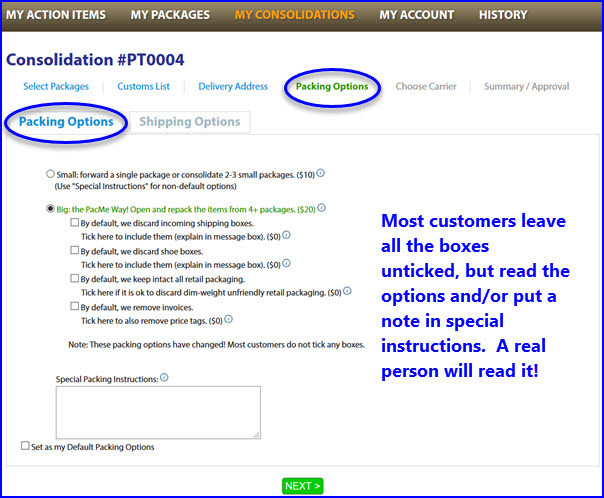
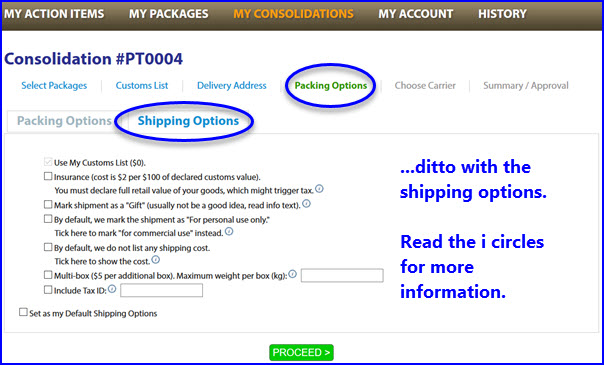
Step 6: Select your packing & shipping options It’s best to set all your packing and shipping defaults beforehand since you will often choose the same options. You can always override them in this step. That said, most customers leave all the boxes unticked anyway - that's the default.
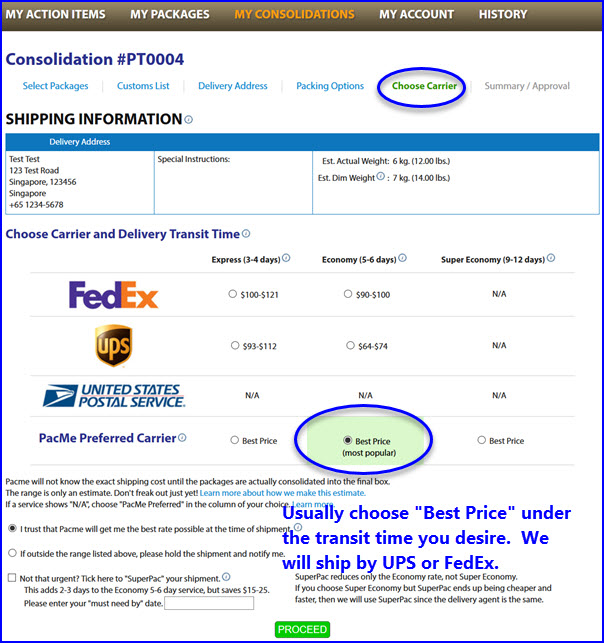
Step 7: Choose the carrier and transit speed We partner with the major carriers (UPS, FedEx, and USPS) and can pass along our volume discounts to you. You will receive real-time quotes during this step. They are only estimates because we obviously won’t know the exact weight and dimensions of the Outgoing Package until we do the actual consolidation. Most people tick the "PacMe Preferred" carrier button and we will ship it out by the cheapest way between UPS and FedEx, but you can choose a specific carrier if you want. You also pick your transit speed in this step:
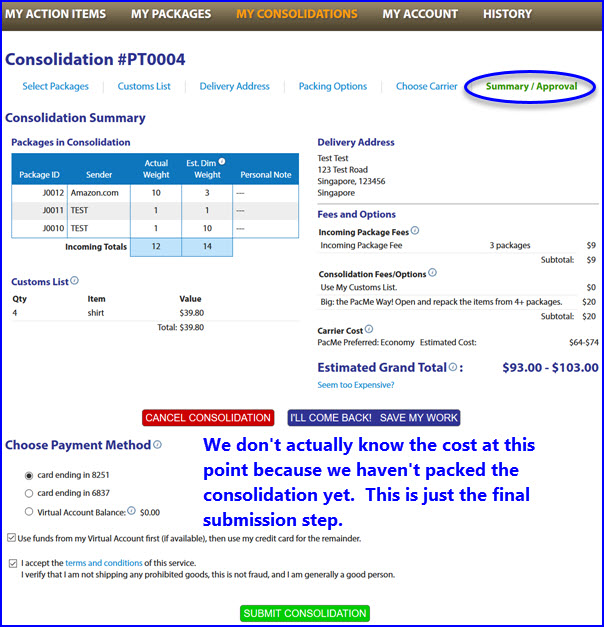
Most importantly, please don't freak out at this stage. If the quote seems high, send us a chat if we haven't already sent you one. Usually the issue is that the consolidation is relatively small (we are a better value for larger consolidations), you have a lot of bulky items that trigger dimensional weight (we try to estimate the effect of this, but might be off in our pre-pack calculation), or the shipping calculator malfunctioned.
Step 8: Summary and select payment method
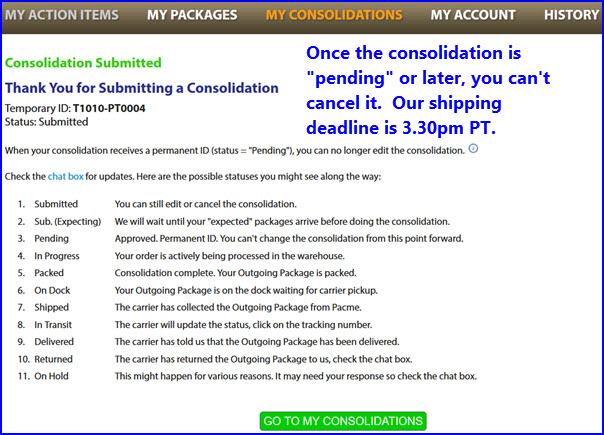
Step 6: Congratulations
Video Tutorial This video is a bit outdated and some of the layouts have changed, but you can get the idea.
Expand to full view and change resolution to 1080p to be able to read the text.
Now let’s go back and visit the My Packages and My Consolidation pages again. There are 2 views of the same information. My Packages focuses on the individual Incoming Packages. It clearly shows the entire list of all the Incoming Packages that you have in the warehouse (or are expecting), where they are currently located, and whether or not they are already associated with a particular consolidation. It is like an “expanded” list of your packages.
On the My Consolidations page, the focus is on the consolidation. It is a “collapsed” list of your Incoming Packages, where the header is the associated consolidation. You can drill down into each consolidation to see which Incoming Packages are inside it.
Most customers live in the My Packages screen, but if you have a lot of concurrent consolidations going on, sometimes it is more orderly over on the My Consolidations screen.
You can always click on the ID of an Incoming Package (e.g. J0121) or a Consolidation (e.g. P0045) and that will take you to a tabbed page with the information about that specific package or consolidation. Each one has its own chat box so it is important to make comments or ask questions in the right place.
The My Consolidations page has 2 tabs: Active and Completed. That was easy.
The “My Action Items” page acts as the dashboard for your account. You will arrive here when you log into your account. It’s important to complete your actions items before you want us to complete our action items!
Action items marked with the red triangle are to-do’s that you must complete before we can move on with the particular package, consolidation, or account activity.
Action Items can be viewed and/or cleared:
The My Action Items page has 4 sections that mirror the main tabs discussed above.
|


